#docker port mapping tutorial
Explore tagged Tumblr posts
Visit Tumblr Blog
Explore Tumblr blogs with no restrictions, modern design and the best experience.
Last Seen Tumblr Blogs


Fun Fact
BuzzFeed published a report claiming that Tumblr was utilized as a distribution channel for Russian agents to influence American voting habits during the 2016 presidential election in Feb 2018.
Link
#Automation#bookmarks#cloud#configuration#containerization#Dashboard#DevOps#Docker#Heimdall#homeserver#Install#Linux#Monitoring#open-source#quicksetup#self-hosted#Server#systemadministration#UI#webapplication
0 notes
Text
Docker Container Port Mapping Tutorial for beginners | Docker Port Expose and Port Forwarding
Full Video Link: https://youtu.be/2gie3gpDJUg Hi, a new #video on #dockerportmapping is published on @codeonedigest #youtube channel. Learn docker container port forwarding and docker expose. What is docker port mapping and -p option. Running docker cont
Docker container port mapping and port forwarding. Docker expose attribute in Docker file is used to forward container port to the host machine. Running docker container on custom port. Using docker expose, run the docker application on specific port. How to run docker image on specific port? What is port mapping in docker container? Why docker port mapping is not working? Why containerized…

View On WordPress
#docker#docker and Kubernetes#docker compose#docker compose port mapping#docker container port change#docker container port forwarding not working#docker container port mapping#docker container port mapping explained#docker container port not exposed#docker container ports explained#docker port forwarding#docker port forwarding doesn’t work#docker port forwarding existing container#docker port forwarding running container#docker port mapping#docker port mapping explained#docker port mapping not working#docker port mapping tutorial#docker port mapping vs expose#docker tutorial#docker tutorial for beginners#port mapping in running docker container#run docker container on custom port#update docker container portainer#what is docker
0 notes
Text
Davmail gateway thunderbird

#Davmail gateway thunderbird how to#
#Davmail gateway thunderbird install#
You can now use this to interface the mail client(s) of your choice with an Exchange server. Enjoy!Īnd with that, you have davmail running inside a container, with the appropriate port-mappings configured. Complexity avoided is hours of time we get to keep. You can start, stop, kill, abuse, disabuse, etc, the container davmail is running inside without fear of anything more than disrupting communications between your clients and the server. This container is stateless - that is, it only handles translating between standards-compliant and Exchange-compliant tools.
#Davmail gateway thunderbird install#
Now that we have an upstart config file, all that remains is to install the file appropriately (that is, copy it into /etc/init/ and start the service: That is, when you go looking for IMAP, you'll find it accessible at 127.0.0.1:11143 from the cloud instance only this prevents attackers from being able to connect to your davmail instance remotely. binds only to ports on the loopback interface.We additionally tell docker to bind ours such that our cloud instance: Remember nix systems disallow non-privileged process from binding to ports Docker port-forwards are also established from the "trial run" log above we can see that the ports davmail will listen on are: Not surprisingly, the heart is centered around the docker run command that we can see at the core of the upstart config.
#Davmail gateway thunderbird how to#
declares how to start (lines 15-27) and stop (lines 30-35) the service.declares that the service should be relaunched if it terminates unexpectedly (line 11) and establishes safe limits (line 12).declares dependencies on the docker.io service (lines 6 and 7).Note how our upstart config does a couple different things here: It is available by default on recent Ubuntu systems, and is very convienient to our purposes. Upstart is an approach to unix daemon management. Tada! :) Configure a container to run as a system service via upstart If so, you can use this image as a starting point, ADD the changed configuration to the image, and rebuild. You may need to edit the davmail configuration to reflect the specific needs of your Exchange environment. does not run davmail as root inside the container.does not require any bind-mounts or other external volumes to be attached.We're going to use the rsrchboy/davmail-savvis-docker image - for obvious reasons - as it gives us a configured davmail container that: There are a couple davmail images available on the Docker Hub. It's worth mentioning that adding your userid to this group will allow you to interface with the docker service without needing to "sudo" it all the time this is left as an exercise for the reader. On line 33 we see a docker group being created. Our previous tutorial on containing Chef with Vagrant may provide some guidelines, but, as always, this is left as an exercise for the reader. You can fire up basic Ubuntu machine fairly easily. Prerequisitesįor the purposes of this article, we're going to assume that you're an enligtened sort, and are running a Ubuntu 14.04-based cloud instance (or workstation, or.). Even if your mail is boring beyond belief, please, do not access it unencrypted. Common - and well-established - solutions include the use of ssh port forwarding or (for a less ad-hoc approach) stunnel. Security is of utmost concern, particularly in a corporate environment, so please note that securing the connections between your local workstation and the cloud instance. One may find a more satisfying approach in using tools like puppet-git-receiver and Gareth Rushgrove's most excellent docker Puppet Forge module to manage the use of the upstream Docker packages as well as our container's upstart configuration - both of which will be covered in a future tutorial. For simplicity, we're using the docker.io package from Ubuntu and configuring by hand. Provisioning a CenturyLink Cloud instance is left as an exercise for the reader. Install Docker on a CenturyLink Cloud instance, provision a stateless container image running a davmail instance, and have the system manage the container via upstart. It's also standalone, can be used statelessly, and - with apologies - is Java, making it a fantastic candidate for running inside a Docker container. It's a great tool - and one of the only solutions. davmail is a Java application that knows how to translate between standards-compliant clients (like, say, Thunderbird) and an Exchange server that speaks only Exchange. This may pose a problem for you, if you prefer a non-Microsoft mail client: if the compatibility features are enabled, you'll be able to access your mail via IMAP and send over SMTP, as the Internet intended. Love it or hate it, sometimes we have to use an Exchange server to communicate.
0 notes
Text
Use kitematic to link containers

#Use kitematic to link containers how to
#Use kitematic to link containers software
You can use programs on your existing desktop without needing to touch your host’s configuration.
#Use kitematic to link containers software
This approach can be safer when you didn’t create the container image.Ĭontainerised graphical apps are useful when you’re evaluating software or need to run two versions of a package. First, if you haven’t yet done so, download and start Kitematic.
#Use kitematic to link containers how to
This is a quick tutorial demonstrating how to set up a local Minecraft server using Kitematic and Docker. You may also choose to run a VNC server within the container. Kitematic tutorial: Set up a Minecraft server. I encounter a Fatal error for link container when i try to deploy guacamole, anybody can show me how to set. For general use, sharing the host’s X socket usually provides the simplest solution. I am new to docker, so i mainly use kitematic. You have the choice of two approaches when running graphical programs within a containerised environment. Restart your container by clicking the Restart button. The Finder opens, allowing you to replace your current map with the new one you desire. Kitematic automates the Docker installation and setup. 306, 307 multiple container networks 210, 211 Music Store application 92 Music. Kitematic is an open source project built to simplify and streamline using Docker on a Mac or Windows PC. Kestrel server 90, 91 Kitematic 35 Kubernetes cluster reference link 335. Download the latest version of Kitematic via. We use Docker Volume to map the folder from the Minecraft Docker container onto your computer. Kitematic is a simple application for managing Docker containers on Mac, Linux and Windows. You should now be able to interact with the graphical programs running within your Docker container. Open the data folder from Kitematic (Select Enable all volumes to edit files via Finder). Connect on port 5900 without authentication. Use the container’s IP address with your VNC client. You’ll find the IP address near the bottom of the output, within the Network node. Find the IP address of your container by running docker ps, noting down the container ID and passing it to docker inspect. To connect to the server, you’ll need a VNC client on your host.
0 notes
Text
Prestashop Security
With this easy, touch-enabled jQuery picture zoom plugin, visitors will have the flexibility to enlarge merchandise and suppose about them to minor particulars. With this extension your customers won’t have to go to the product web page every time they wish to see a larger merchandise picture. All they want to do is to click on the product photo and it will appear at the popup window. Placing the Google map into your site’s web page provides a clue to your guests about your business’ location. Such approach helps consumer to know about your corporation location and your working hours.
Сonduct a bodily stock rely using a barcode scanner or a product search with Product Picker software. Take orders via cellphone and send invoices to be paid through e mail to make it simple in your clients. For brick and mortar stores use POS with a barcode scanner to add merchandise to order, calculate the change or apply a discount.
It is written in the PHP programming language with help for the MySQL database administration system. It has a software program dependency on the Symfony PHP framework. Go to your BTCPay server, select a retailer, open its settings and choose "Access Tokens".
Use developer instruments in Google Chrome to detect the element you are looking for and find the file that needs edits. To change colors and primary layouts, go together with a custom.css file, whereas grid/list switcher will let you swap between grid or record layouts manually. Also, use an editor, such as Notepad+ , for fast adjustments. PrestaShop is a freemium, open-source software used to construct an internet retailer. It has gained recognition as an eCommerce answer utilized by each small and huge companies all round the world. It currently powers 300,000 shops worldwide and is available in 60 completely different languages.
They solely have to sort the brand of a product or a keyword within the search field and the system will present the results. As a business owner, you want your customers to acquire associated merchandise or accessories of the gadgets they’ve chosen. By providing comparable or complementary merchandise you will not solely enhance the searching expertise, but in addition increase overall gross sales. Share YouTube videos on the homepage of your on-line retailer to provide richer multimedia expertise for its visitors. Custom block is an area the place you'll be able to insert info of different sorts, from contacts to sale phrases and cost details. Each time a model new product is added, this data automatically stays in place.
Also, it permits creating filters with the limitless number of search standards, available in the store by default or are created, when including the products. Ready To Go Store Quick Start – our eStore Team will install and customize your on-line store, organising cost modules, currencies, transport, taxes options and so on. PrestaShop supplies a fundamental responsive theme by default.
However, usually occasions the IP adjustments dynamically, which must also be saved in thoughts. While getting a new module always make certain that it has a good community score. Moreover, if the set up is outdated, it is highly vulnerable to assaults as exploits are publicly obtainable. Steal delicate info corresponding to customer data, orders, bank card information and so forth. This characteristic lets your users to sort out the merchandise they need, much faster.
Secondly, make it recognizable and associated with your e-store. Remember that the choice of a site name may serve search engine optimization and branding functions. Documentation offered for you is extraordinarily express. The manuals will information you through the PrestaShop set up process, template installation, and additional web site customization.
WooCommerce is a completely customizable e-commerce platform constructed for Wordpress. Displays a block with links relative to a consumer's account. Adds an data block geared toward providing helpful information to reassure prospects that your retailer is trustworthy. This is why we have set up a Bug Bounty Program the place anyone can privately contact us with all the details about points that have an effect on the security of PrestaShop retailers or clients. Our safety team will answer you, and focus on of a timeframe on your publication of the details. If you want to use other port, open and modify the file docker-compose.yml.
Find and fix lacking or broken pictures, unused photos and clear them in your database to optimize site speed. Check information integrity issues and rapidly right them. Retrieve SEO issues and amend them to optimize your retailer. PrestaShop is considered one of the world’s most popular ecommerce platforms, and most profitable open source tasks. This site covers the technical elements of PrestaShop and it’s tailor-made for theme, module and core developers.
Hence the site admins should safe it following security practices. TemplateMonster is a marketplace the place you ought to buy everything you need to create a web site. Hundreds of impartial developers sell their merchandise here in order that you would create your own distinctive project. Installing the theme should not be a problem, particularly if you’ve chosen the theme of the most recent 1.7 version that is simpler to make use of in comparability with its predecessor. You can set up the theme both manually or utilizing PrestaShop Cloud or Themeinstallator.
If you wish to contribute code to PrestaShop, learn the CONTRIBUTING.md file on this repository or learn the tutorials about contribution on the documentation web site. Add-on modules extend the software's built-in functionalities. Users could install modules instantly throughout the software program administration panel or develop their very own. Connect and share data within a single location that is structured and simple to go looking. If you need to learn the way Regiondo Booking Software can improve the sales of your tour and activity business, merely strive our resolution now. Your web site visitors may have the choice to choose both the date and time in your presents.
To view the completely different pricing plans, please use the ‘Pricing’ button. If the payment is profitable, the shopper is redirected to the success web page and the status is defined as “CAPTURE REQUESTED“. You can install this module in a classic means, then instantly modify the file “hipay_enterprise_data.php” and the strategy “hookActionHipayApiRequest” to add your info. Update your secret and public API keys within the plugin's settings with the keys from your live Hub account.
It is a normal protocol for guaranteeing that the communications between Prestashop store and the users are secure. SSL works utilizing the elliptical curve cryptography where two distinctive key pairs are generated. This might help prevent man-in-the-middle attacks on Prestashop store. To increase the Prestashop safety, admins can purchase an SSL certificates and enable SSL on the Prestashop installation. While installing and configuring the server, some ports could have been left open.
Ensure that the admin dashboard password is a secure one. Also, some frequent passwords like admin, password, qwerty and so on should by no means be used. Moreover, keep separate passwords for FTP, cPanel, Dashboard and so forth. It is of the utmost importance for Prestashop safety that a password should be very strong. Enabling SSL offers a significant boost to the Prestashop safety.
Levilon Prestashop Theme has a quantity of functioning options of a modern template for multi objective in constructing a website. Levilon Theme supporting the latest model of Prestashop. Megatree Prestashop Responsive Theme is totally customizable options and appropriate for e-commerce websites of multipurpose store.
When search engines like Google crawl the web site for indexing, these pages get listed. PrestaShop platform has plenty of modules meant to increase its initial functionality. These extremely versatile extensions are used to customise the net pages of an online retailer. Basically, PrestaShop modules are packages using PrestaShop’s functionality meaning to make the eCommerce engine simpler in use or more customizable.
Necessary cookies are absolutely important for the website to perform properly. This class solely includes cookies that ensures basic functionalities and security features of the website. At the identical time, remember that PrestaShop is taken into account to be much less scalable than different platforms .
This characteristic makes the site more informative as the visitors get all essential details about the product at once. Mega footers could be so much greater than an afterthought containing fine print of an web site. With the right design they reinforce model consciousness and drive person actions by providing site-wide entry to helpful secondary info. The company blog roll can be displayed on the primary page of the positioning. This would not only assist hold the audience engaged however would additionally present larger web optimization rankings and seamless visitor expertise. TM Related Products module will display similar or associated merchandise to these your purchasers were on the lookout for on the web page.
Unavailable slots are updated on-the-spot so you avoid overbookings. There are scores of free as nicely as paid PrestaShop GDPR and cookie bar modules that you need to use right here. Brute pressure attacks are fairly widespread within the Prestashop shops. The prime goal of such assaults is to disclose default or weak credentials.
PrestaShop makes use of an online template system that allows customers to customise store themes and add new options via add-on modules. The PrestaShop Addons market offers a platform for third-party developers to sell themes and modules to retailers. As seen in the article, there are multiple ways to assaults your Prestashop store. More and more Prestashop security issues are discovered yearly. So, won’t it be nice should you may discover Prestashop security loopholes before the attacker does? The answer to this may be a comprehensive Prestashop safety audit and pentesting.
As of September 14, 2019, the issuer will resolve if a cost is processed depending on the evaluation of greater than 150 data collected in the course of the purchasing course of. Thanks to our Prestashop 1.6.x / 1.7.x module we deal with many of the knowledge with out you having to develop anything. You can see all the brand new parameters onour explorer API. Go to your storefront and add a product to your cart. This information assumes that you've PrestaShop (our plugin is appropriate with model 1.7.6 and later) put in.
These skilled designs allow your clients to shop simply regardless of where they're from. PrestaShop offers greater than modules, themes and providers to assist you construct and develop your on-line retailer, whether you’re an skilled vendor or just getting started in e-commerce. The preferences settings on the dashboard can add extra to the PrestaShop security. Using a cookie makes it easy to trace customers and establish unique customers from faux ones. If the cookie mismatches with the IP it was issued to, it is prone to be an attacker.
Making a alternative might be straightforward owing to a vast amount of theme classes that can swimsuit a project of any sort – from private to enterprise. Korean skincare merchandise turn into extremely popular nowadays. From hyaluronic mask sheets and eye patches to numerous makeup gadgets. This is Montsera, a theme that understands your fashion sense. You don't need to be a coding skilled to create an internet store. Simply obtain the theme you love and set up it to get started selling instantly.
0 notes
Text
How to Deploy a Ceph Storage to Bare Virtual Machines
Ceph is a freely available storage platform that implements object storage on a single distributed computer cluster and provides interfaces for object-, block- and file-level storage. Ceph aims primarily for completely distributed operation without a single point of failure. Ceph storage manages data replication and is generally quite fault-tolerant. As a result of its design, the system is both self-healing and self-managing.
Ceph has loads of benefits and great features, but the main drawback is that you have to host and manage it yourself. In this post, we'll check two different approaches of virtual machine deployment with Ceph.
Anatomy of a Ceph cluster
Before we dive into the actual deployment process, let's see what we'll need to fire up for our own Ceph cluster.
There are three services that form the backbone of the cluster
ceph monitors (ceph-mon) maintain maps of the cluster state and are also responsible for managing authentication between daemons and clients
managers (ceph-mgr) are responsible for keeping track of runtime metrics and the current state of the Ceph cluster
object storage daemons (ceph-osd) store data, handle data replication, recovery, rebalancing, and provide some ceph monitoring information.
Additionally, we can add further parts to the cluster to support different storage solutions
metadata servers (ceph-mds) store metadata on behalf of the Ceph Filesystem
rados gateway (ceph-rgw) is an HTTP server for interacting with a Ceph Storage Cluster that provides interfaces compatible with OpenStack Swift and Amazon S3.
There are multiple ways of deploying these services. We'll check two of them:
first, using the ceph/deploy tool,
then a docker-swarm based vm deployment.
Let's kick it off!
Ceph Setup
Okay, a disclaimer first. As this is not a production infrastructure, we’ll cut a couple of corners.
You should not run multiple different Ceph demons on the same host, but for the sake of simplicity, we'll only use 3 virtual machines for the whole cluster.
In the case of OSDs, you can run multiple of them on the same host, but using the same storage drive for multiple instances is a bad idea as the disk’s I/O speed might limit the OSD daemons’ performance.
For this tutorial, I've created 4 EC2 machines in AWS: 3 for Ceph itself and 1 admin node. For ceph-deploy to work, the admin node requires passwordless SSH access to the nodes and that SSH user has to have passwordless sudo privileges.
In my case, as all machines are in the same subnet on AWS, connectivity between them is not an issue. However, in other cases editing the hosts file might be necessary to ensure proper connection.
Depending on where you deploy Ceph security groups, firewall settings or other resources have to be adjusted to open these ports
22 for SSH
6789 for monitors
6800:7300 for OSDs, managers and metadata servers
8080 for dashboard
7480 for rados gateway
Without further ado, let's start deployment.
Ceph Storage Deployment
Install prerequisites on all machines
$ sudo apt update $ sudo apt -y install ntp python
For Ceph to work seamlessly, we have to make sure the system clocks are not skewed. The suggested solution is to install ntp on all machines and it will take care of the problem. While we're at it, let's install python on all hosts as ceph-deploy depends on it being available on the target machines.
Prepare the admin node
$ ssh -i ~/.ssh/id_rsa -A [email protected]
As all the machines have my public key added to known_hosts thanks to AWS, I can use ssh agent forwarding to access the Ceph machines from the admin node. The first line ensures that my local ssh agent has the proper key in use and the -A flag takes care of forwarding my key.
$ wget -q -O- 'https://download.ceph.com/keys/release.asc' | sudo apt-key add - echo deb https://download.ceph.com/debian-nautilus/ $(lsb_release -sc) main | sudo tee /etc/apt/sources.list.d/ceph.list $ sudo apt update $ sudo apt -y install ceph-deploy
We'll use the latest nautilus release in this example. If you want to deploy a different version, just change the debian-nautilus part to your desired release (luminous, mimic, etc.).
$ echo "StrictHostKeyChecking no" | sudo tee -a /etc/ssh/ssh_config > /dev/null
OR
$ ssh-keyscan -H 10.0.0.124,10.0.0.216,10.0.0.104 >> ~/.ssh/known_hosts
Ceph-deploy uses SSH connections to manage the nodes we provide. Each time you SSH to a machine that is not in the list of known_hosts (~/.ssh/known_hosts), you'll get prompted whether you want to continue connecting or not. This interruption does not mesh well with the deployment process, so we either have to use ssh-keyscan to grab the fingerprint of all the target machines or disable the strict host key checking outright.
10.0.0.124 ip-10-0-0-124.eu-north-1.compute.internal ip-10-0-0-124 10.0.0.216 ip-10-0-0-216.eu-north-1.compute.internal ip-10-0-0-216 10.0.0.104 ip-10-0-0-104.eu-north-1.compute.internal ip-10-0-0-104
Even though the target machines are in the same subnet as our admin and they can access each other, we have to add them to the hosts file (/etc/hosts) for ceph-deploy to work properly. Ceph-deploy creates monitors by the provided hostname, so make sure it matches the actual hostname of the machines otherwise the monitors won't be able to join the quorum and the deployment fails. Don't forget to reboot the admin node for the changes to take effect.
$ mkdir ceph-deploy $ cd ceph-deploy
As a final step of the preparation, let's create a dedicated folder as ceph-deploy will create multiple config and key files during the process.
Deploy resources
$ ceph-deploy new ip-10-0-0-124 ip-10-0-0-216 ip-10-0-0-104
The command ceph-deploy new creates the necessary files for the deployment. Pass it the hostnames of the monitor nodes, and it will create cepf.conf and ceph.mon.keyring along with a log file.
The ceph-conf should look something like this
[global] fsid = 0572e283-306a-49df-a134-4409ac3f11da mon_initial_members = ip-10-0-0-124, ip-10-0-0-216, ip-10-0-0-104 mon_host = 10.0.0.124,10.0.0.216,10.0.0.104 auth_cluster_required = cephx auth_service_required = cephx auth_client_required = cephx
It has a unique ID called fsid, the monitor hostnames and addresses and the authentication modes. Ceph provides two authentication modes: none (anyone can access data without authentication) or cephx (key based authentication).
The other file, the monitor keyring is another important piece of the puzzle, as all monitors must have identical keyrings in a cluster with multiple monitors. Luckily ceph-deploy takes care of the propagation of the key file during virtual deployments.
$ ceph-deploy install --release nautilus ip-10-0-0-124 ip-10-0-0-216 ip-10-0-0-104
As you might have noticed so far, we haven't installed ceph on the target nodes yet. We could do that one-by-one, but a more convenient way is to let ceph-deploy take care of the task. Don't forget to specify the release of your choice, otherwise you might run into a mismatch between your admin and targets.
$ ceph-deploy mon create-initial
Finally, the first piece of the cluster is up and running! create-initial will deploy the monitors specified in ceph.conf we generated previously and also gather various key files. The command will only complete successfully if all the monitors are up and in the quorum.
$ ceph-deploy admin ip-10-0-0-124 ip-10-0-0-216 ip-10-0-0-104
Executing ceph-deploy admin will push a Ceph configuration file and the ceph.client.admin.keyring to the /etc/ceph directory of the nodes, so we can use the ceph CLI without having to provide the ceph.client.admin.keyring each time to execute a command.
At this point, we can take a peek at our cluster. Let's SSH into a target machine (we can do it directly from the admin node thanks to agent forwarding) and run sudo ceph status.
$ sudo ceph status cluster: id: 0572e283-306a-49df-a134-4409ac3f11da health: HEALTH_OK services: mon: 3 daemons, quorum ip-10-0-0-104,ip-10-0-0-124,ip-10-0-0-216 (age 110m) mgr: no daemons active osd: 0 osds: 0 up, 0 in data: pools: 0 pools, 0 pgs objects: 0 objects, 0 B usage: 0 B used, 0 B / 0 B avail pgs:
Here we get a quick overview of what we have so far. Our cluster seems to be healthy and all three monitors are listed under services. Let's go back to the admin and continue adding pieces.
$ ceph-deploy mgr create ip-10-0-0-124
For luminous+ builds a manager daemon is required. It's responsible for monitoring the state of the Cluster and also manages modules/plugins.
Okay, now we have all the management in place, let's add some storage to the cluster to make it actually useful, shall we?
First, we have to find out (on each target machine) the label of the drive we want to use. To fetch the list of available disks on a specific node, run
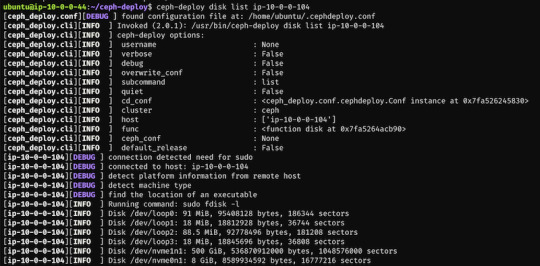
$ ceph-deploy disk list ip-10-0-0-104
Here's a sample output:

$ ceph-deploy osd create --data /dev/nvme1n1 ip-10-0-0-124 $ ceph-deploy osd create --data /dev/nvme1n1 ip-10-0-0-216 $ ceph-deploy osd create --data /dev/nvme1n1 ip-10-0-0-104
In my case the label was nvme1n1 on all 3 machines (courtesy of AWS), so to add OSDs to the cluster I just ran these 3 commands.
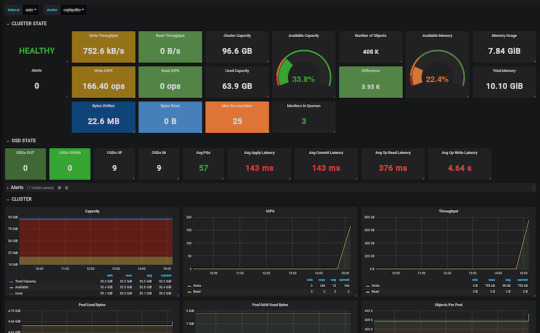
At this point, our cluster is basically ready. We can run ceph status to see that our monitors, managers and OSDs are up and running. But nobody wants to SSH into a machine every time to check the status of the cluster. Luckily there's a pretty neat dashboard that comes with Ceph, we just have to enable it.
...Or at least that's what I thought. The dashboard was introduced in luminous release and was further improved in mimic. However, currently we're deploying nautilus, the latest version of Ceph. After trying the usual way of enabling the dashboard via a manager
$ sudo ceph mgr module enable dashboard
we get an error message saying Error ENOENT: all mgr daemons do not support module 'dashboard', pass --force to force enablement.
Turns out, in nautilus the dashboard package is no longer installed by default. We can check the available modules by running
$ sudo ceph mgr module ls
and as expected, dashboard is not there, it comes in a form a separate package. So we have to install it first, luckily it's pretty easy.
$ sudo apt install -y ceph-mgr-dashboard
Now we can enable it, right? Not so fast. There's a dependency that has to be installed on all manager hosts, otherwise we get a slightly cryptic error message saying Error EIO: Module 'dashboard' has experienced an error and cannot handle commands: No module named routes.
$ sudo apt install -y python-routes
We're all set to enable the dashboard module now. As it's a public-facing page that requires login, we should set up a cert for SSL. For the sake of simplicity, I've just disabled the SSL feature. You should never do this in production, check out the official docs to see how to set up a cert properly. Also, we'll need to create an admin user so we can log in to our dashboard.
$ sudo ceph mgr module enable dashboard $ sudo ceph config set mgr mgr/dashboard/ssl false $ sudo ceph dashboard ac-user-create admin secret administrator
By default, the dashboard is available on the host running the manager on port 8080. After logging in, we get an overview of the cluster status, and under the cluster menu, we get really detailed overviews of each running daemon.


If we try to navigate to the Filesystems or Object Gateway tabs, we get a notification that we haven't configured the required resources to access these features. Our cluster can only be used as a block storage right now. We have to deploy a couple of extra things to extend its usability.
Quick detour: In case you're looking for a company that can help you with Ceph, or DevOps in general, feel free to reach out to us at RisingStack!
Using the Ceph filesystem
Going back to our admin node, running
$ ceph-deploy mds create ip-10-0-0-124 ip-10-0-0-216 ip-10-0-0-104
will create metadata servers, that will be inactive for now, as we haven’t enabled the feature yet. First, we need to create two RADOS pools, one for the actual data and one for the metadata.
$ sudo ceph osd pool create cephfs_data 8 $ sudo ceph osd pool create cephfs_metadata 8
There are a couple of things to consider when creating pools that we won’t cover here. Please consult the documentation for further details.
After creating the required pools, we’re ready to enable the filesystem feature
$ sudo ceph fs new cephfs cephfs_metadata cephfs_data
The MDS daemons will now be able to enter an active state, and we are ready to mount the filesystem. We have two options to do that, via the kernel driver or as FUSE with ceph-fuse.
Before we continue with the mounting, let’s create a user keyring that we can use in both solutions for authorization and authentication as we have cephx enabled. There are multiple restrictions that can be set up when creating a new key specified in the docs. For example:
$ sudo ceph auth get-or-create client.user mon 'allow r' mds 'allow r, allow rw path=/home/cephfs' osd 'allow rw pool=cephfs_data' -o /etc/ceph/ceph.client.user.keyring
will create a new client key with the name user and output it into ceph.client.user.keyring. It will provide write access for the MDS only to the /home/cephfs directory, and the client will only have write access within the cephfs_data pool.
Mounting with the kernel
Now let’s create a dedicated directory and then use the key from the previously generated keyring to mount the filesystem with the kernel.
$ sudo mkdir /mnt/mycephfs $ sudo mount -t ceph 13.53.114.94:6789:/ /mnt/mycephfs -o name=user,secret=AQBxnDFdS5atIxAAV0rL9klnSxwy6EFpR/EFbg==
Attaching with FUSE
Mounting the filesystem with FUSE is not much different either. It requires installing the ceph-fuse package.
$ sudo apt install -y ceph-fuse
Before we run the command we have to retrieve the ceph.conf and ceph.client.user.keyring files from the Ceph host and put the in /etc/ceph. The easiest solution is to use scp.
$ sudo scp [email protected]:/etc/ceph/ceph.conf /etc/ceph/ceph.conf $ sudo scp [email protected]:/etc/ceph/ceph.client.user.keyring /etc/ceph/ceph.keyring
Now we are ready to mount the filesystem.
$ sudo mkdir cephfs $ sudo ceph-fuse -m 13.53.114.94:6789 cephfs
Using the RADOS gateway
To enable the S3 management feature of the cluster, we have to add one final piece, the rados gateway.
$ ceph-deploy rgw create ip-10-0-0-124
For the dashboard, it's required to create a radosgw-admin user with the system flag to enable the Object Storage management interface. We also have to provide the user's access_key and secret_key to the dashboard before we can start using it.
$ sudo radosgw-admin user create --uid=rg_wadmin --display-name=rgw_admin --system $ sudo ceph dashboard set-rgw-api-access-key <access_key> $ sudo ceph dashboard set-rgw-api-secret-key <secret_key>
Using the Ceph Object Storage is really easy as RGW provides an interface identical to S3. You can use your existing S3 requests and code without any modifications, just have to change the connection string, access, and secret keys.
Ceph Storage Monitoring
The dashboard we’ve deployed shows a lot of useful information about our cluster, but monitoring is not its strongest suit. Luckily Ceph comes with a Prometheus module. After enabling it by running:
$ sudo ceph mgr module enable prometheus
A wide variety of metrics will be available on the given host on port 9283 by default. To make use of these exposed data, we’ll have to set up a prometheus instance.
I strongly suggest running the following containers on a separate machine from your Ceph cluster. In case you are just experimenting (like me) and don’t want to use a lot of VMs, make sure you have enough memory and CPU left on your virtual machine before firing up docker, as it can lead to strange behaviour and crashes if it runs out of resources.
There are multiple ways of firing up Prometheus, probably the most convenient is with docker. After installing docker on your machine, create a prometheus.yml file to provide the endpoint where it can access our Ceph metrics.
# /etc/prometheus.yml scrape_configs: - job_name: 'ceph' # metrics_path defaults to '/metrics' # scheme defaults to 'http'. static_configs: - targets: ['13.53.114.94:9283]
Then launch the container itself by running:
$ sudo docker run -p 9090:9090 -v /etc/prometheus.yml:/etc/prometheus/prometheus.yml prom/prometheus
Prometheus will start scraping our data, and it will show up on its dashboard. We can access it on port 9090 on its host machine. Prometheus dashboard is great but does not provide a very eye-pleasing dashboard. That’s the main reason why it’s usually used in pair with Graphana, which provides awesome visualizations for the data provided by Prometheus. It can be launched with docker as well.
$ sudo docker run -d -p 3000:3000 grafana/grafana
Grafana is fantastic when it comes to visualizations, but setting up dashboards can be a daunting task. To make our lives easier, we can load one of the pre-prepared dashboards, for example this one.
Ceph Deployment: Lessons Learned & Next Up
CEPH can be a great alternative to AWS S3 or other object storages when running in the public operating your service in the private cloud is simply not an option. The fact that it provides an S3 compatible interface makes it a lot easier to port other tools that were written with a “cloud first” mentality. It also plays nicely with Prometheus, thus you don’t need to worry about setting up proper monitoring for it, or you can swap it a more simple, more battle-hardened solution such as Nagios.
In this article, we deployed CEPH to bare virtual machines, but you might need to integrate it into your Kubernetes or Docker Swarm cluster. While it is perfectly fine to install it on VMs next to your container orchestration tool, you might want to leverage the services they provide when you deploy your CEPH cluster. If that is your use case, stay tuned for our next post covering CEPH where we’ll take a look at the black magic required to use CEPH on Docker Swarm and Kubernetes.
In the next CEPH tutorial which we'll release next week, we're going to take a look at valid ceph storage alternatives with Docker or with Kubernetes.
PS: Feel free to reach out to us at RisingStack in case you need help with Ceph or Ops in general!
How to Deploy a Ceph Storage to Bare Virtual Machines published first on https://koresolpage.tumblr.com/
0 notes
Text
Ms Sql Server For Mac

Sql Server Studio Mac
Ms Sql Server Management Studio For Mac
Ms Sql Server 2019 For Mac
Ms Sql Server Download For Mac
Here I’ll show you how to get SQL Server up and running on your Mac in less than half an hour. And the best part is, you’ll have SQL Server running locally without needing any virtualization software.
Prior to SQL Server 2017, if you wanted to run SQL Server on your Mac, you first had to create a virtual machine (using VirtualBox, Parallels Desktop, VMware Fusion, or Bootcamp), then install Windows onto that VM, then finally SQL Server. This is still a valid option depending on your requirements (here’s how to install SQL Server on a Mac with VirtualBox if you’d like to try that method). Zip unlocker online.
My employer produces a simple, proof-of-concept HTML5-based SQL client which can be used against any ODBC data source on the web-browser host machine, through the HTML5 WebDB-to-ODBC Bridge we also produce. These components are free, for Mac, Windows, and more. Applicable to many of the other answers here - the Type 1 JDBC-to-ODBC Bridge that most are referring to is the one Sun built in to. Microsoft sql server 2008 free download - Microsoft Office 2008 update, Actual ODBC SQL Server driver, MySQL Database Server, and many more programs. There are some suggestions on SQL Server on Mac to run SQL Server in a VM. However what is interesting is that earlier this year MS announced SQL Server to run on Linux. Announcing SQL Server on Linux. Public preview of the next release of SQL Server. And also instructions for installing SQL Server via Docker.
Starting with SQL Server 2017, you can now install SQL Server directly on to a Linux machine. And because macOS is Unix based (and Linux is Unix based), you can run SQL Server for Linux on your Mac. The way to do this is to run SQL Server on Docker.
So let’s go ahead and install Docker. Then we’ll download and install SQL Server.
Sql Server Studio Mac
Install Docker
Download the (free) Docker Community Edition for Mac (unless you’ve already got it installed on your system). This will enable you to run SQL Server from within a Docker container.
To download, visit the Docker CE for Mac download page and click Get Docker.
To install, double-click on the .dmg file and then drag the Docker.app icon to your Application folder.
What is Docker?
Docker is a platform that enables software to run in its own isolated environment. SQL Server (from 2017) can be run on Docker in its own isolated container. Once Docker is installed, you simply download — or “pull” — the SQL Server on Linux Docker Image to your Mac, then run it as a Docker container. This container is an isolated environment that contains everything SQL Server needs to run.
Launch Docker
Launch Docker the same way you’d launch any other application (eg, via the Applications folder, the Launchpad, etc).
When you open Docker, you might be prompted for your password so that Docker can install its networking components and links to the Docker apps. Go ahead and provide your password, as Docker needs this to run.
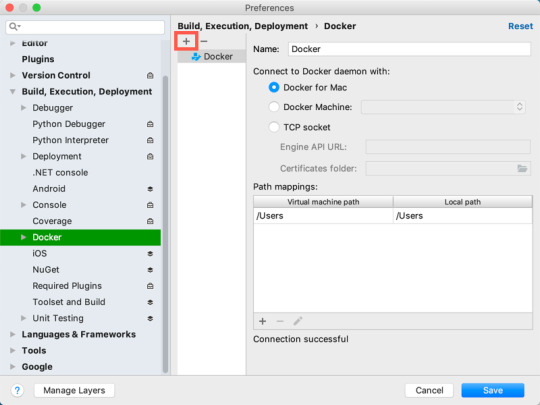
Increase the Memory
By default, Docker will have 2GB of memory allocated to it. SQL Server needs at least 3.25GB. To be safe, increase it to 4GB if you can.
To do this:
Select Preferences from the little Docker icon in the top menu
Slide the memory slider up to at least 4GB
Click Apply & Restart
Download SQL Server
Now that Docker is installed and its memory has been increased, we can download and install SQL Server for Linux.
Open a Terminal window and run the following command.
This downloads the latest SQL Server 2019 for Linux Docker image to your computer.
You can also check for the latest container version on the Docker website if you wish.
Update: When I first wrote this article, I used the following image:
Which downloaded SQL Server 2017. Therefore, the examples below reflect that version.
Launch the Docker Image
Run the following command to launch an instance of the Docker image you just downloaded: Free sims download for mac.
But of course, use your own name and password. Also, if you downloaded a different Docker image, replace microsoft/mssql-server-linux with the one you downloaded.
Here’s an explanation of the parameters:
-dThis optional parameter launches the Docker container in daemon mode. This means that it runs in the background and doesn’t need its own Terminal window open. You can omit this parameter to have the container run in its own Terminal window.--name sql_server_demoAnother optional parameter. This parameter allows you to name the container. This can be handy when stopping and starting your container from the Terminal.-e 'ACCEPT_EULA=Y'The Y shows that you agree with the EULA (End User Licence Agreement). This is required in order to have SQL Server for Linux run on your Mac.-e 'SA_PASSWORD=reallyStrongPwd123'Required parameter that sets the sa database password.-p 1433:1433This maps the local port 1433 to port 1433 on the container. This is the default TCP port that SQL Server uses to listen for connections.microsoft/mssql-server-linuxThis tells Docker which image to use. If you downloaded a different one, use it instead.
Password Strength
If you get the following error at this step, try again, but with a stronger password.
I received this error when using reallyStrongPwd as the password (but of course, it’s not a really strong password!). I was able to overcome this by adding some numbers to the end. However, if it wasn’t just a demo I’d definitely make it stronger than a few dictionary words and numbers.
Check the Docker container (optional)
You can type the following command to check that the Docker container is running.
If it’s up and running, it should return something like this:
Install sql-cli (unless already installed)
Run the following command to install the sql-cli command line tool. This tool allows you to run queries and other commands against your SQL Server instance.
This assumes you have NodeJs installed. If you don’t, download it from Nodejs.org first. Installing NodeJs will automatically install npm which is what we use in this command to install sql-cli.
Permissions Error?
If you get an error, and part of it reads something like Please try running this command again as root/Administrator, try again, but this time prepend sudo to your command:
Connect to SQL Server
Now that sql-cli is installed, we can start working with SQL Server via the Terminal window on our Mac.
Connect to SQL Server using the mssql command, followed by the username and password parameters.
You should see something like this:
This means you’ve successfully connected to your instance of SQL Server.
Run a Quick Test
Run a quick test to check that SQL Server is up and running and you can query it.
For example, you can run the following command to see which version of SQL Server your running:
If it’s running, you should see something like this (but of course, this will depend on which version you’re running):
If you see a message like this, congratulations — SQL Server is now up and running on your Mac!
A SQL Server GUI for your Mac – Azure Data Studio
Azure Data Studio (formerly SQL Operations Studio) is a free GUI management tool that you can use to manage SQL Server on your Mac. You can use it to create and manage databases, write queries, backup and restore databases, and more.
BS.Player - the best multimedia player (WebM, HD and AVC video, movie, audio, DVD, YouTube) in the world!BS.Player ™ is used by more than 70 million multi media users throughout the world and it has been translated into more than 90 languages worldwide. Now, you can finally enjoy the playback of HD DVD and AVCHD movies of the highest quality with minimal system requirements. Because it does not use much of the CPU processing resources for multimedia playback it is suitable for all those who use slightly less capable computers. All downloaded versions of our FREE version exceed the sum of all downloads of competitive media players and payable WebM or DVD players. Download bs player for mac. BS.Player can playback any YouTube movie directly from the internet and save it to local disk.Most importantly, BS.Player ™, a free media movie player, is a product for the world multi media market and is therefore equipped with advanced subtitle options which enable the users to watch video content with subtitles from many popular subtitle formats (MicroDVD.sub, VobSub.sub +.idx, SubViewer.sub, (Advanced) SubStation Alpha.ssa or.ass, SubRip.srt, VPlayer.txt.).
Azure Data Studio is available on Windows, Mac and Linux.
Here are some articles/tutorials I’ve written for Azure Data Studio:
Another Free SQL Server GUI – DBeaver
Another SQL Server GUI tool that you can use on your Mac (and Windows/Linux/Solaris) is DBeaver.
DBeaver is a free, open source database management tool that can be used on most database management systems (such as MySQL, PostgreSQL, MariaDB, SQLite, Oracle, DB2, SQL Server, Sybase, Microsoft Access, Teradata, Firebird, Derby, and more).
Ms Sql Server Management Studio For Mac
I wrote a little introduction to DBeaver, or you can go straight to the DBeaver download page and try it out with your new SQL Server installation.
Ms Sql Server 2019 For Mac


Limitations of SQL Server for Linux/Mac
Ms Sql Server Download For Mac
SQL Server for Linux does have some limitations when compared to the Windows editions (although this could change over time). The Linux release doesn’t include many of the extra services that are available in the Windows release, such as Analysis Services, Reporting Services, etc. Here’s a list of what’s available and what’s not on SQL Server 2017 for Linux and here’s Microsoft’s list of Editions and supported features of SQL Server 2019 on Linux.
Another limitation is that SQL Server Management Studio is not available on Mac or Linux. SSMS a full-blown GUI management for SQL Server, and it provides many more features than Azure Data Studio and DBeaver (at least at the time of writing). You can still use SSMS on a Windows machine to connect to SQL Server on a Linux or Mac machine, but you just can’t install it locally on the Linux or Mac machine.
If you need any of the features not supported in SQL Server for Linux, you’ll need SQL Server for Windows. However, you can still run SQL Server for Windows on your Mac by using virtualization software. Here’s how to install SQL Server for Windows on a Mac using VirtualBox.
0 notes
Video
youtube
Spring boot Microservice in Docker Container with Postgres Database in D...
Hi, a new #video on #springboot #microservices in #dockercontainer with #postgres #database running in #docker #container is published on #codeonedigest #youtube channel. Learn #springbootmicroservices with #postgressql in docker #containers #programming #coding with #codeonedigest
#postgresdatabasedockervolume #postgresdatabasedockerinstall #postgresdatabasedockersetup #postgresdatabasedockertutorial #postgresdatabasedocker #dockerfile #dockertutorial #dockertutorialforbeginners #dockercontainer #dockerfullcourse #compass #docker #container #dockerimage #dockerfile #nosql #postgresdatabaseinstallation #springboot #postgres #microservices #postgresdb #springboot #Springbootmicroserviceswithpostgres #stepbystepspringbootmicroserviceswithpostgressql #Springboottutorial #springboot #springbootproject #springboottutorialforbeginners #springbootannotations #springbootmicroservices #springbootfullcourse #springboottutorial #springbootprojectstepbystep #postgresjava #postgresinstallation #postgrestutorial #postgrestutorialforbeginners #Springbootmicroservicespostgresdatabase #springbootmicroservices #springbootmicroservicespostgressqlexample #springbootmicroservices #springbootmicroservices #springbootpostgressql #microservicespostgres #postgressqlmicroservicesexample #springbootmicroservicedocker #microservicesindockercontainer #runmicroservicesindockercontainer
#youtube#springboot#spring boot microservice#spring boot#microservice#springboot microservice#microservice in docker container#spring boot microservice with postgres database#postgressql#postgres database#postgres#postgres database in docker container#postgres in docker container#docker container#docker tutorial#postgres tutorial#spring boot tutorial#microservice tutorial#port mapping#port expose#port forwarding#bridge network in docker#dockerhub#dockerfile#docker image
1 note
·
View note
Text
Python Tutorial: A simple Flask App using Redis with Docker Compose.
Docker Compose enables multiple Docker containers to run in a single environment. In this tutorial, we'll write a basic Flask app with Redis using Docker Compose. What is Flask? Flask is a very lightweight framework for developing APIs in Python. For the production purposes, it's recommended to use Flask with uWSGI application server and nginx which is a web server and a reverse proxy. But in this tutorial, we will just create a simple Flask application. What is redis? Redis is a free open source data memory store, used as a database, cache and message broker. Prerequisites: You need to install Docker Engine and Docker Compose.
STEP-1:
Create a project folder on your host machine and enter that directory: $ mkdir project_folder $ cd project_folder
STEP-2:
Create requirements.txt file in the project folder and add the following lines in that file. #project_folder/requirements.txt flask redis
STEP-3:
Create app.py file in the project folder and add the following lines. #project_folder/app.py import Flask and Redis libraries from flask import Flask from redis import Redis import random app = Flask(name) redis = Redis(host='redis', port=6379) # declare main route @app.route('/') def main(): return 'Hi. In order to earn bonus points enter your name in the url. eg: /John' # declare a route that gets the visitor's name. Every name has its own bonus points. @app.route('/') def greet(name): bonus = random.randrange(1, 100) redis.incrby(name, bonus) return 'Hello %s. You have earned %d bonus points. Your total point is %s.' % (name, bonus, redis.get(name)) # run the flask application on the local development server. if name == "main": app.run(host="0.0.0.0", debug=True)
STEP-4:
Create Dockerfile in the project_folder and add the following: FROM python:latest ADD . /app WORKDIR /app RUN pip3 install -r requirements.txt CMD python3 app.py
STEP-5:
Create docker-compose.yml in the project_folder and define the services. There will be two services named app and redis.The app service builds the custom image from the Dockerfile in the project folder which is the current directory.Container’s exposed port (5000) is mapped to the port 5000 on the host.The current directory is mapped to the working directory "/app" folder inside the container.This service depends on redis service. The redis service uses the latest Redis image from Docker Hub. version: '3' services: app: build: . ports: - "5000:5000" volumes: - .:/app depends_on: - redis redis: image: redis
STEP-6:
Build and Run with Docker Compose Start the application from your directory: $ docker-compose up
STEP-7:
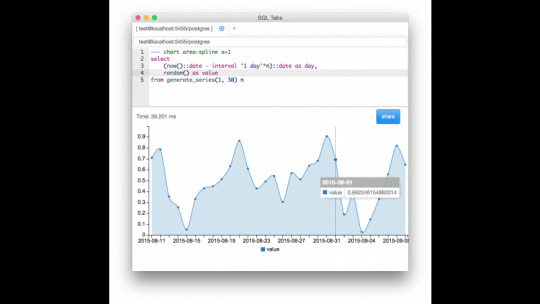
You can test the app on your browser with http://localhost:5000. Second, visit http://localhost:5000/username You can try different usernames. Each username will have different bonus points thanks to redis.
STEP-8:
You can stop the application with CTRL+C. And then stop the container. $ docker-compose stop
STEP-9
Troubleshooting: If you make some changes and the changes don't apply, remove the built images and rebuild them. docker-compose rm -f docker-compose pull docker-compose up --build Further Reading: - Unix/ Linux Bash Shell Scripting. - How to use “amazon-linux-extras” and install a package on AWS EC2 running Amazon Linux 2? - How to remember Linux commands? What do Linux commands stand for? Read the full article
0 notes
Text
Setting up a REST Delivery Point for SOAP Endpoints
Fronting synchronous HTTP endpoints with queues and topics allows senders and receivers of information to actively participate in event-driven systems, which are usually the domain of asynchronous messaging interactions.
Solace PubSub+ lets you front HTTP endpoints with queues and topics by proxying RESTful calls via REST Delivery Points (RDPs) and API Microgateway software. In this post I’ll discuss the differences between those options and show you how to use the API Microgateway to proxy a SOAP Web service. To keep things interesting, our sample Web service requires clients to use both TLS and WS-Security.
Here’s a visual overview of what we’ll be doing:
Prerequisites
You should know:
How to set up, configure and use PubSub+, and obviously you’ll need a copy of PubSub+, which you can download here.
How to install and use Docker and Linux
About SOAP Web Services
Differences Between the API Microgateway and RDP
Solace PubSub+ supports two approaches to RESTful messaging, namely RDPs and the API Microgateway. The table below summarizes some of the key differences between both paradigms.
REST Delivery Point Microgateway Default mode Fire & Forget (request/reply optional) Request/Reply Propagates HTTP headers? No Yes Supports all HTTP verbs? No Yes Receive requests on Queues Topics
In short, we tend to use RDPs when the use case calls for sending vanilla HTTP POSTs, with optional request/reply semantics. Since we want a reply from the postoffice endpoint and may need to optionally set the SOAPAction header, the Microgateway approach is the better choice.
Find a Secure SOAP Web service
First, we need to find a SOAP Web service that supports HTTPS and WS-Security. Fortunately, Canada Post offers several APIs that match these criteria once you register with their free Developer Program. Why Canada Post? Because we’re a proud Canadian company!
For this tutorial, we’ll be querying the GetNearestPostOffice operation to find postal outlets near Solace’s headquarters in Ottawa, Canada.
Fire Up a Solace PubSub+ Instance
Next, we need to set up a PubSub+ instance. The simplest way to achieve this is via the PubSub+ Docker Compose YAML. Be sure to uncomment the line exposing the REST Default VPN port, i.e. 9000. Without this, we won’t be able to execute an HTTP POST against the PubSub+ instance.
Log in to Your Broker Instance
Once the container boots up, log in to http://localhost:8080 in your browser with the username admin and password admin.
You should now have a secure SOAP Web service from Canada Post, a PubSub+ instance, and be logged in to your broker instance.
Set up the Microgateway
In this section I’ll explain how to enable the Microgateway connectivity, then create the RDP, a REST consumer, and a queue binding.
Enable the Microgateway Connectivity
To enable the Microgateway connectivity:
Navigate to Message VPN > Connectivity > REST.
Change the service’s mode to Gateway.
Keep in mind that microgateways operate at the VPN level, which means you cannot mix and match REST Delivery Points and gateways for a given VPN.
Create the RDP
Although distinct, gateways leverage RDPs internally to achieve service connectivity. Consequently, we still need to set up an RDP to connect to our Canada Post service.
Click on the default VPN and go to Client Connections > REST. This will bring up the RDP configuration page.
Click on the green REST Delivery Point button in the top right corner.
Give your RDP a name (e.g. Canada Post) and click Create. Keep in mind that this step does not do anything functional. We’re simply establishing a top-level bucket for the actual SOAP configuration.
Leave the defaults and click Apply. Do not turn on Enabled yet.
The newly created RDP is displayed in the Downstate along with some operational data.
Create a REST Consumer
To create a REST consumer:
Click on the newly created RDP to drill down to REST Consumers: Canada Post > REST Consumers. This is where we define the connection parameters for the Web service.
Click on the green REST Consumer button to add a new REST consumer.
Give the new REST consumer a name that reflects the SOAP endpoint (e.g. postoffice if the URL is http://www.canadapost.ca/ws/soap/postoffice). Though not strictly necessary, naming your endpoint this way helps to keep things identifiable in situations with multiple endpoints.
Click on your new consumer endpoint, complete the host details, and set the port to 443 for HTTPS. Do not enable the consumer yet.
Click Apply.
Create a Queue Binding
Along with the host, you need to identify the exact endpoint to connect to. Since PubSub+ is primarily an event broker, clients interact with it via queues and topics. Consequently, we need to attach the endpoint to a queue to receive SOAP payloads. This is done through queue bindings.
To bind a queue, you need to define a queue, bind the queue to the SOAP endpoint, and subscribe the queue to a topic.
Define a Queue
Navigate to the Queues tab and click on the green + Queue button in the top right corner.
Create a queue in the form of [rdpname].[consumername] and click Create. This format is not mandatory but useful when you need to quickly identify the queue related to a given SOAP endpoint.
Tune the queue settings as necessary for your implementation and click Apply.
Bind the Queue to the SOAP Endpoint
Now that we have a queue defined, you can bind it to your SOAP endpoint.
Navigate to Connections > REST > Canada Post > Queue Binding.
After clicking on the green + Queue Binding button, select the queue we previously created and click Create.
In the dialog that pops up, enter the SOAP endpoint in the Post Request Target field and click Apply.
Note: Don’t forget the leading “/”.
Set Up a Topic to Queue Subscription
Microgateway mode requires users to send service requests on a special topic consisting of the HTTP Method + HTTP Resource Path. This is then mapped to the queue binding you created above. Listing 1 demonstrates how a topic may be constructed.
Resource path from WSDL: https://ct.soa-gw.canadapost.ca/rs/soap/postoffice
HTTP Method: POST
Resulting PubSub+ topic: POST/rs/soap/postoffice
To subscribe our queue to this topic, navigate to Queues > postoffice > Subscriptions and click + Subscription.
Enter the relevant subscription and click Create.
Once subscribed, any requests POSTed to /rs/soap/postoffice on the broker are forwarded to the associated queue, triggering a call to the example Web service.
Set Up TLS
In this section I’ll explain how to upload the TLS certificates, load the certificate authority and add Trusted Common Names.
Phew! The service is now set up… well, almost. You’ll notice that we have not enabled anything yet since TLS has not been configured. We will do this by adding the appropriate certificate authorities (CA) to the PubSub+ trust store in PEM format.
Note: Trust stores currently can only be set up using the PubSub+ CLI.
Upload the TLS Certificates
PubSub+ requires that the entire certificate authority chain for a given site be uploaded to the /certs directory on the broker. Initially obtaining the certificates can be accomplished using a browser or openssl. However, the exact process is outside the scope of this post.
Note: The root & all intermediary CAs must be installed individually on the PubSub+ instance. PubSub+ does not support bundled CAs.
Once you have the individual certificates, connect to the container’s shell and save each certificate under /usr/sw/jail/certs. The easiest way is to open a text editor in the directory and copy and paste the contents of each certificate to a new file.
C:\Users\UshShukla>docker exec -it <PubSub+ container name> /bin/bash The Solace PubSub+ Standard is proprietary software of Solace Corporation. By accessing the Solace PubSub+ Standard you are agreeing to the license terms and conditions located at
LICENSE AGREEMENT FOR SOLACE SOFTWARE
[root@f0fb1e6fe45d ~]# cd /usr/sw/jail/certs [root@f0fb1e6fe45d ~]# vi geotrust-rsa-ca.pem …paste contents… …save file… …repeat for other certificates…
Load the Certificate Authority
Now that our CAs are saved, we need to load them into the PubSub+ trust store, as documented here. An example of loading the root certificate authority is provided below.
[root@f0fb1e6fe45d certs]# /usr/sw/loads/currentload/bin/cli -A Solace PubSub+ Standard Version 9.0.0.17 The Solace PubSub+ Standard is proprietary software of Solace Corporation. By accessing the Solace PubSub+ Standard you are agreeing to the license terms and conditions located at
LICENSE AGREEMENT FOR SOLACE SOFTWARE
Copyright 2004-2018 Solace Corporation. All rights reserved. To purchase product support, please contact Solace at: https://solace.com/contact-us/ Operating Mode: Message Routing Node f0fb1e6fe45d> enable f0fb1e6fe45d# configure f0fb1e6fe45d(configure)# authentication f0fb1e6fe45d(configure/authentication)# create certificate-authority DigiCert-Global-Root-CA f0fb1e6fe45d(.../authentication/certificate-authority)# certificate file digitrust-root-ca.pem
We name the certificate authority according to the Common Name (CN) (e.g. DigiCert…). This approach reduces the likelihood of duplicating CAs in the trust store.
Once uploaded to the trust store, the original CA file can be removed from the /certs/ directory.
Add the Trusted Common Names
For PubSub+ to identify the appropriate certificate(s) to use when interacting with the Web service, we need to update our RDP configuration with the Common Names of each certificate. The example below uses openssl to get this information, though you could just as easily inspect the TLS output of your browser.
[root@f0fb1e6fe45d certs]# openssl s_client -connect ct.soa-gw.canadapost.ca:443 CONNECTED(00000003) depth=2 C = US, O = DigiCert Inc, OU = www.digicert.com, CN = DigiCert Global Root CA verify return:1 depth=1 C = US, O = DigiCert Inc, OU = www.digicert.com, CN = GeoTrust RSA CA 2018 verify return:1 depth=0 C = CA, ST = Ontario, L = Ottawa, O = Canada Post Corporation, OU = Information Technology-2, CN = stg10.canadapost.ca
In the listing above, we care about all the CN entries.
In the WebUI, log in and navigate to Client Connections>REST>Canada Post>REST Consumers>postoffice>TLS Options
Click on the green + Trusted Common Name button to add the individual CNs.
The completed setup looks like this:
Note: We added the CN of the leaf certificate too, i.e. stg10.canadapost.com.
Enable the RDP and Test the Setup
In this section I’ll explain how to enable the RDP and test the setup.
Enable the RDP
We are ready to fire up the REST Delivery Point! Individually enable each of the configuration elements below:
REST Consumer > postoffice > Enabled
Client Connections > REST > Canada Post > Enabled
If everything has been configured correctly, the RDP status should be Up.
You can drill down to ensure the REST Consumer is Up, too.
Test the Setup
We can test our setup using SOAPUI.
Notes:
The service host in this case is the broker, and we are POSTing to the resource path configured in our topic-queue mapping.
We enable basic authentication and select the option to Authenticate pre-emptively. Why? Since PubSub+ acts as a proxy to the final service, it needs to have the entire payload available to send. Otherwise our call will fail. Selecting the option above essentially ensures SOAPUI pre-builds the entire request payload, including the WS-Security headers.
Be sure to set the SOAPAction HTTP header if necessary. This example does not require it.
Conclusion
With a little effort, PubSub+ can let you expose SOAP Web services across an asynchronous messaging architecture, allowing them to fully enjoy the benefits of an event-driven architecture.
Learn more about:
Microgateways
Managing REST Delivery Points
The post Setting up a REST Delivery Point for SOAP Endpoints appeared first on Solace.
Setting up a REST Delivery Point for SOAP Endpoints published first on https://jiohow.tumblr.com/
0 notes
Text
How to Deploy a Ceph Storage to Bare Virtual Machines

Ceph is a freely available storage platform that implements object storage on a single distributed computer cluster and provides interfaces for object-, block- and file-level storage. Ceph aims primarily for completely distributed operation without a single point of failure. It manages data replication and is generally quite fault-tolerant. As a result of its design, the system is both self-healing and self-managing.
Ceph has loads of benefits and great features, but the main drawback is that you have to host and manage it yourself. In this post, we'll check two different approaches of deploying Ceph.
Anatomy of a Ceph cluster
Before we dive into the actual deployment process, let's see what we'll need to fire up for our own Ceph cluster.
There are three services that form the backbone of the cluster
monitors (ceph-mon) maintain maps of the cluster state and are also responsible for managing authentication between daemons and clients
managers (ceph-mgr) are responsible for keeping track of runtime metrics and the current state of the Ceph cluster
object storage daemons (ceph-osd) store data, handle data replication, recovery, rebalancing, and provide some monitoring information
Additionally, we can add further parts to the cluster to support different storage solutions
metadata servers (ceph-mds) store metadata on behalf of the Ceph Filesystem
rados gateway (ceph-rgw) is an HTTP server for interacting with a Ceph Storage Cluster that provides interfaces compatible with OpenStack Swift and Amazon S3.
There are multiple ways of deploying these services. We'll check two of them:
first, using the ceph/deploy tool,
then a docker-swarm based deployment.
Let's kick it off!
Ceph Setup
Okay, a disclaimer first. As this is not a production infrastructure, we’ll cut a couple of corners.
You should not run multiple different Ceph demons on the same host, but for the sake of simplicity, we'll only use 3 VMs for the whole cluster.
In the case of OSDs, you can run multiple of them on the same host, but using the same storage drive for multiple instances is a bad idea as the disk’s I/O speed might limit the OSD daemons’ performance.
For this tutorial, I've created 4 EC2 machines in AWS: 3 for Ceph itself and 1 admin node. For ceph-deploy to work, the admin node requires passwordless SSH access to the nodes and that SSH user has to have passwordless sudo privileges.
In my case, as all machines are in the same subnet on AWS, connectivity between them is not an issue. However, in other cases editing the hosts file might be necessary to ensure proper connection.
Depending on where you deploy Ceph security groups, firewall settings or other resources have to be adjusted to open these ports
22 for SSH
6789 for monitors
6800:7300 for OSDs, managers and metadata servers
8080 for dashboard
7480 for rados gateway
Without further ado, let's start deployment.
Ceph Storage Deployment
Install prerequisites on all machines
$ sudo apt update $ sudo apt -y install ntp python
For Ceph to work seamlessly, we have to make sure the system clocks are not skewed. The suggested solution is to install ntp on all machines and it will take care of the problem. While we're at it, let's install python on all hosts as ceph-deploy depends on it being available on the target machines.
Prepare the admin node
$ ssh -i ~/.ssh/id_rsa -A [email protected]
As all the machines have my public key added to known_hosts thanks to AWS, I can use ssh agent forwarding to access the Ceph machines from the admin node. The first line ensures that my local ssh agent has the proper key in use and the -A flag takes care of forwarding my key.
$ wget -q -O- 'https://download.ceph.com/keys/release.asc' | sudo apt-key add - echo deb https://download.ceph.com/debian-nautilus/ $(lsb_release -sc) main | sudo tee /etc/apt/sources.list.d/ceph.list $ sudo apt update $ sudo apt -y install ceph-deploy
We'll use the latest nautilus release in this example. If you want to deploy a different version, just change the debian-nautilus part to your desired release (luminous, mimic, etc.).
$ echo "StrictHostKeyChecking no" | sudo tee -a /etc/ssh/ssh_config > /dev/null
OR
$ ssh-keyscan -H 10.0.0.124,10.0.0.216,10.0.0.104 >> ~/.ssh/known_hosts
Ceph-deploy uses SSH connections to manage the nodes we provide. Each time you SSH to a machine that is not in the list of known_hosts (~/.ssh/known_hosts), you'll get prompted whether you want to continue connecting or not. This interruption does not mesh well with the deployment process, so we either have to use ssh-keyscan to grab the fingerprint of all the target machines or disable the strict host key checking outright.
10.0.0.124 ip-10-0-0-124.eu-north-1.compute.internal ip-10-0-0-124 10.0.0.216 ip-10-0-0-216.eu-north-1.compute.internal ip-10-0-0-216 10.0.0.104 ip-10-0-0-104.eu-north-1.compute.internal ip-10-0-0-104
Even though the target machines are in the same subnet as our admin and they can access each other, we have to add them to the hosts file (/etc/hosts) for ceph-deploy to work properly. Ceph-deploy creates monitors by the provided hostname, so make sure it matches the actual hostname of the machines otherwise the monitors won't be able to join the quorum and the deployment fails. Don't forget to reboot the admin node for the changes to take effect.
$ mkdir ceph-deploy $ cd ceph-deploy
As a final step of the preparation, let's create a dedicated folder as ceph-deploy will create multiple config and key files during the process.
Deploy resources
$ ceph-deploy new ip-10-0-0-124 ip-10-0-0-216 ip-10-0-0-104
The command ceph-deploy new creates the necessary files for the deployment. Pass it the hostnames of the monitor nodes, and it will create cepf.conf and ceph.mon.keyring along with a log file.
The ceph-conf should look something like this
[global] fsid = 0572e283-306a-49df-a134-4409ac3f11da mon_initial_members = ip-10-0-0-124, ip-10-0-0-216, ip-10-0-0-104 mon_host = 10.0.0.124,10.0.0.216,10.0.0.104 auth_cluster_required = cephx auth_service_required = cephx auth_client_required = cephx
It has a unique ID called fsid, the monitor hostnames and addresses and the authentication modes. Ceph provides two authentication modes: none (anyone can access data without authentication) or cephx (key based authentication).
The other file, the monitor keyring is another important piece of the puzzle, as all monitors must have identical keyrings in a cluster with multiple monitors. Luckily ceph-deploy takes care of the propagation of the key file during deployment.
$ ceph-deploy install --release nautilus ip-10-0-0-124 ip-10-0-0-216 ip-10-0-0-104
As you might have noticed so far, we haven't installed ceph on the target nodes yet. We could do that one-by-one, but a more convenient way is to let ceph-deploy take care of the task. Don't forget to specify the release of your choice, otherwise you might run into a mismatch between your admin and targets.
$ ceph-deploy mon create-initial
Finally, the first piece of the cluster is up and running! create-initial will deploy the monitors specified in ceph.conf we generated previously and also gather various key files. The command will only complete successfully if all the monitors are up and in the quorum.
$ ceph-deploy admin ip-10-0-0-124 ip-10-0-0-216 ip-10-0-0-104
Executing ceph-deploy admin will push a Ceph configuration file and the ceph.client.admin.keyring to the /etc/ceph directory of the nodes, so we can use the ceph CLI without having to provide the ceph.client.admin.keyring each time to execute a command.
At this point, we can take a peek at our cluster. Let's SSH into a target machine (we can do it directly from the admin node thanks to agent forwarding) and run sudo ceph status.
$ sudo ceph status cluster: id: 0572e283-306a-49df-a134-4409ac3f11da health: HEALTH_OK services: mon: 3 daemons, quorum ip-10-0-0-104,ip-10-0-0-124,ip-10-0-0-216 (age 110m) mgr: no daemons active osd: 0 osds: 0 up, 0 in data: pools: 0 pools, 0 pgs objects: 0 objects, 0 B usage: 0 B used, 0 B / 0 B avail pgs:
Here we get a quick overview of what we have so far. Our cluster seems to be healthy and all three monitors are listed under services. Let's go back to the admin and continue adding pieces.
$ ceph-deploy mgr create ip-10-0-0-124
For luminous+ builds a manager daemon is required. It's responsible for monitoring the state of the Cluster and also manages modules/plugins.
Okay, now we have all the management in place, let's add some storage to the cluster to make it actually useful, shall we?
First, we have to find out (on each target machine) the label of the drive we want to use. To fetch the list of available disks on a specific node, run
$ ceph-deploy disk list ip-10-0-0-104
Here's a sample output:
$ ceph-deploy osd create --data /dev/nvme1n1 ip-10-0-0-124 $ ceph-deploy osd create --data /dev/nvme1n1 ip-10-0-0-216 $ ceph-deploy osd create --data /dev/nvme1n1 ip-10-0-0-104
In my case the label was nvme1n1 on all 3 machines (courtesy of AWS), so to add OSDs to the cluster I just ran these 3 commands.
At this point, our cluster is basically ready. We can run ceph status to see that our monitors, managers and OSDs are up and running. But nobody wants to SSH into a machine every time to check the status of the cluster. Luckily there's a pretty neat dashboard that comes with Ceph, we just have to enable it.
...Or at least that's what I thought. The dashboard was introduced in luminous release and was further improved in mimic. However, currently we're deploying nautilus, the latest version of Ceph. After trying the usual way of enabling the dashboard via a manager
$ sudo ceph mgr module enable dashboard
we get an error message saying Error ENOENT: all mgr daemons do not support module 'dashboard', pass --force to force enablement.
Turns out, in nautilus the dashboard package is no longer installed by default. We can check the available modules by running
$ sudo ceph mgr module ls
and as expected, dashboard is not there, it comes in a form a separate package. So we have to install it first, luckily it's pretty easy.
$ sudo apt install -y ceph-mgr-dashboard
Now we can enable it, right? Not so fast. There's a dependency that has to be installed on all manager hosts, otherwise we get a slightly cryptic error message saying Error EIO: Module 'dashboard' has experienced an error and cannot handle commands: No module named routes.
$ sudo apt install -y python-routes
We're all set to enable the dashboard module now. As it's a public-facing page that requires login, we should set up a cert for SSL. For the sake of simplicity, I've just disabled the SSL feature. You should never do this in production, check out the official docs to see how to set up a cert properly. Also, we'll need to create an admin user so we can log in to our dashboard.
$ sudo ceph mgr module enable dashboard $ sudo ceph config set mgr mgr/dashboard/ssl false $ sudo ceph dashboard ac-user-create admin secret administrator
By default, the dashboard is available on the host running the manager on port 8080. After logging in, we get an overview of the cluster status, and under the cluster menu, we get really detailed overviews of each running daemon.

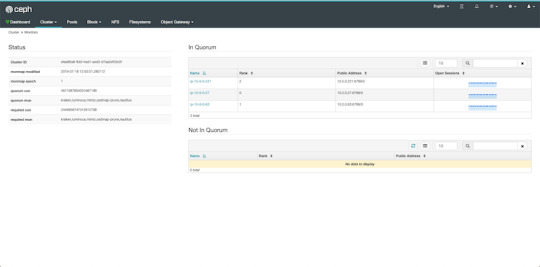
If we try to navigate to the Filesystems or Object Gateway tabs, we get a notification that we haven't configured the required resources to access these features. Our cluster can only be used as a block storage right now. We have to deploy a couple of extra things to extend its usability.
Quick detour: In case you're looking for a company that can help you with Ceph, or DevOps in general, feel free to reach out to us at RisingStack!
Using the Ceph filesystem
Going back to our admin node, running
$ ceph-deploy mds create ip-10-0-0-124 ip-10-0-0-216 ip-10-0-0-104
will create metadata servers, that will be inactive for now, as we haven’t enabled the feature yet. First, we need to create two RADOS pools, one for the actual data and one for the metadata.
$ sudo ceph osd pool create cephfs_data 8 $ sudo ceph osd pool create cephfs_metadata 8
There are a couple of things to consider when creating pools that we won’t cover here. Please consult the documentation for further details.
After creating the required pools, we’re ready to enable the filesystem feature
$ sudo ceph fs new cephfs cephfs_metadata cephfs_data
The MDS daemons will now be able to enter an active state, and we are ready to mount the filesystem. We have two options to do that, via the kernel driver or as FUSE with ceph-fuse.
Before we continue with the mounting, let’s create a user keyring that we can use in both solutions for authorization and authentication as we have cephx enabled. There are multiple restrictions that can be set up when creating a new key specified in the docs. For example:
$ sudo ceph auth get-or-create client.user mon 'allow r' mds 'allow r, allow rw path=/home/cephfs' osd 'allow rw pool=cephfs_data' -o /etc/ceph/ceph.client.user.keyring
will create a new client key with the name user and output it into ceph.client.user.keyring. It will provide write access for the MDS only to the /home/cephfs directory, and the client will only have write access within the cephfs_data pool.
Mounting with the kernel
Now let’s create a dedicated directory and then use the key from the previously generated keyring to mount the filesystem with the kernel.
$ sudo mkdir /mnt/mycephfs $ sudo mount -t ceph 13.53.114.94:6789:/ /mnt/mycephfs -o name=user,secret=AQBxnDFdS5atIxAAV0rL9klnSxwy6EFpR/EFbg==
Attaching with FUSE
Mounting the filesystem with FUSE is not much different either. It requires installing the ceph-fuse package.
$ sudo apt install -y ceph-fuse
Before we run the command we have to retrieve the ceph.conf and ceph.client.user.keyring files from the Ceph host and put the in /etc/ceph. The easiest solution is to use scp.
$ sudo scp [email protected]:/etc/ceph/ceph.conf /etc/ceph/ceph.conf $ sudo scp [email protected]:/etc/ceph/ceph.client.user.keyring /etc/ceph/ceph.keyring
Now we are ready to mount the filesystem.
$ sudo mkdir cephfs $ sudo ceph-fuse -m 13.53.114.94:6789 cephfs
Using the RADOS gateway
To enable the S3 management feature of the cluster, we have to add one final piece, the rados gateway.
$ ceph-deploy rgw create ip-10-0-0-124
For the dashboard, it's required to create a radosgw-admin user with the system flag to enable the Object Storage management interface. We also have to provide the user's access_key and secret_key to the dashboard before we can start using it.
$ sudo radosgw-admin user create --uid=rg_wadmin --display-name=rgw_admin --system $ sudo ceph dashboard set-rgw-api-access-key <access_key> $ sudo ceph dashboard set-rgw-api-secret-key <secret_key>
Using the Ceph Object Storage is really easy as RGW provides an interface identical to S3. You can use your existing S3 requests and code without any modifications, just have to change the connection string, access, and secret keys.
Ceph Storage Monitoring
The dashboard we’ve deployed shows a lot of useful information about our cluster, but monitoring is not its strongest suit. Luckily Ceph comes with a Prometheus module. After enabling it by running:
$ sudo ceph mgr module enable prometheus
A wide variety of metrics will be available on the given host on port 9283 by default. To make use of these exposed data, we’ll have to set up a prometheus instance.
I strongly suggest running the following containers on a separate machine from your Ceph cluster. In case you are just experimenting (like me) and don’t want to use a lot of VMs, make sure you have enough memory and CPU left on your VM before firing up docker, as it can lead to strange behaviour and crashes if it runs out of resources.
There are multiple ways of firing up Prometheus, probably the most convenient is with docker. After installing docker on your machine, create a prometheus.yml file to provide the endpoint where it can access our Ceph metrics.
# /etc/prometheus.yml scrape_configs: - job_name: 'ceph' # metrics_path defaults to '/metrics' # scheme defaults to 'http'. static_configs: - targets: ['13.53.114.94:9283]
Then launch the container itself by running:
$ sudo docker run -p 9090:9090 -v /etc/prometheus.yml:/etc/prometheus/prometheus.yml prom/prometheus
Prometheus will start scraping our data, and it will show up on its dashboard. We can access it on port 9090 on its host machine. Prometheus dashboard is great but does not provide a very eye-pleasing dashboard. That’s the main reason why it’s usually used in pair with Graphana, which provides awesome visualizations for the data provided by Prometheus. It can be launched with docker as well.
$ sudo docker run -d -p 3000:3000 grafana/grafana
Grafana is fantastic when it comes to visualizations, but setting up dashboards can be a daunting task. To make our lives easier, we can load one of the pre-prepared dashboards, for example this one.

Ceph Deployment: Lessons Learned & Next Up
CEPH can be a great alternative to AWS S3 or other object storages when running in the public operating your service in the private cloud is simply not an option. The fact that it provides an S3 compatible interface makes it a lot easier to port other tools that were written with a “cloud first” mentality. It also plays nicely with Prometheus, thus you don’t need to worry about setting up proper monitoring for it, or you can swap it a more simple, more battle-hardened solution such as Nagios.
In this article, we deployed CEPH to bare VMs, but you might need to integrate it into your Kubernetes or Docker Swarm cluster. While it is perfectly fine to install it on VMs next to your container orchestration tool, you might want to leverage the services they provide when you deploy your CEPH cluster. If that is your use case, stay tuned for our next post covering CEPH where we’ll take a look at the black magic required to use it on Kubernetes and Docker Swarm.
In the next article which we'll release next week, we're going to take a look at valid ceph storage alternatives with Docker or with Kubernetes.
PS: Feel free to reach out to us at RisingStack in case you need help with Ceph or Ops in general!
Hey Friends! The pace on the RisingStack blog was a little slow this summer, but WE'RE BACK! 🥳👽🤘 We just released a longform howto article on deploying a @Ceph storage to bare VM's. Take a look, we would love to get some feedback! 👇👇https://t.co/vTKdA4w5jI
— RisingStack 👉 Node.js, K8S & Microservices (@RisingStack) September 23, 2019
How to Deploy a Ceph Storage to Bare Virtual Machines published first on https://koresolpage.tumblr.com/
0 notes
Text
SQLite vs MySQL - What’s the Deal?
In class we’ve utilized the relational database SQLite to represents our schemas and model-entity relationships in mapping our idea of data an objects into a virtual space. When I heard that we would be using SQLite, I instantly recalled a interesting debacle at my recent co-op and it’s usage on Android systems specifically, and why they had started with SQLite, but switched to MySQL. While I was missing a few pieces of the reasons and motivations to moving database application (they had done the switch far prior to my co-op term there) I sought to find the differences between SQLite and MySQL having a near identical use case in either database for this class, and classes prior. While we also utilized PostgreSQL with Docker and containers/ports, we won’t necessarily discuss that here.
So first off, with SQLite and MySQL both being relational databases, what makes SQLite unique? As the name suggests, SQLite is a “lighter” version of MySQL, being much smaller, compact, and providing different functionalities through similar methods. As a more minimalist program, SQLite does not run any background processes (called daemons). This entails a few things. The primary consequence is the main use of SQL, queries. Queries, not passed through a background process to handle them, and calls are directly send and handled by the OS. While this has some overhead, the direct queries are slightly faster, given singular calls are made. When multiple calls are made however, much larger problems can arise, as multiple processes can all be attempting to access the thread running SQLite, locking, thread-safe, and many other practices often avoided can arise.
That being said, SQLite boasts a larger advantage for certain use cases - it’s file based implementation. This means that SQLite is portable, compact, and easy to move around. MySQL on the other hand, involves ports, setup, and various applications along with it’s external dependencies. SQLite also removes user management, which makes usage and processes extremely simple.
From the features above, as engineers there are some glaring problems in production level use. Multi-user management is mandatory in all public development applications. The lack of external features and scaling potential. The lack of supported types compared to MySQL. When it comes to naming schemas, SQLite truly does hold pure to it’s name sake, a more compact, portable, stripped-down version of MySQL.
So if SQLite is just a smaller, compact version of SQL that is less flexible, why use it? SQLite, while scaling less than MySQL, offers a few advantages. Firstly, it’s quick. Given singular application access, SQLite is speedy, easy to use and has a insignificant overhead. With this advantage however, opens up many potential flaws based on usage, due to it’s inherent embedded application nature.
If you’re looking for a quick database application for simple and general use, SQLite may just be what you’re looking for. And if it’s not, even starting in SQLite makes it easy to import into MySQL, as it’s never a bad choice to start if you’re not quite sure what kind of database you need.
Links: https://stackoverflow.com/questions/12666822/what-is-difference-between-sqlite-and-sql
https://www.digitalocean.com/community/tutorials/sqlite-vs-mysql-vs-postgresql-a-comparison-of-relational-database-management-systems
0 notes
Photo

Writing Plugins in Go
Go couldn't load code dynamically prior to Go 1.8. I'm a big proponent of plugin-based systems, which in many cases require loading plugins dynamically. I even considered at some point writing a plugin package based on C integration.
I'm super excited that the Go designers added this capability to the language. In this tutorial, you'll learn why plugins are so important, what platforms are currently supported, and how to create, build, load and use plugins in your programs.
The Rationale for Go Plugins
Go plugins can be used for many purposes. They let you break down your system into a generic engine that's easy to reason about and test, and a lot of plugins adhere to a strict interface with well-defined responsibilities. Plugins can be developed independently from the main program that uses them.
The program can use different combinations of plugins and even multiple versions of the same plugin at the same time. The crisp boundaries between the main program and plugins promote the best practice of loose coupling and separation of concerns.
The "plugin" Package
The new "plugin" package introduced in Go 1.8 has a very narrow scope and interface. It provides the Open() function to load a shared library, which returns a Plugin object. The Plugin object has a Lookup() function that returns a Symbol (empty interface{}) hat can be type asserted to a function or variable exposed by the plugin. That's it.
Platform Support
The plugin package is supported only on Linux at this time. But there are ways, as you'll see, to play with plugins on any operating system.
Preparing a Docker-Based Environment
If you're developing on a Linux box then you just need to install Go 1.8 and you're good to go. But, if you're on Windows or macOS, you need a Linux VM or Docker container. To use it, you must first install Docker.
Once you have Docker installed, open a console Window and type: docker run -it -v ~/go:/go golang:1.8-wheezy bash
This command maps my local $GOPATH at ~/go to /go inside the container. That lets me edit the code using my favorite tools on the host and have it available inside the container for building and running in the Linux environment.
For more information on Docker, check out my "Docker From the Ground Up" series here on Envato Tuts+:
Docker From the Ground Up: Understanding Images
Docker From the Ground Up: Building Images
Docker From the Ground Up: Working With Containers, Part 1
Docker From the Ground Up: Working With Containers, Part 2
Creating a Go Plugin
A Go plugin looks like a regular package, and you can use it as a regular package too. It becomes a plugin only when you build it as a plugin. Here are a couple of plugins that implement a Sort() function that sorts a slice of integers.
QuickSort Plugin
The first plugin implements a naive QuickSort algorithm. The implementation works on slices with unique elements or with duplicates. The return value is a pointer to a slice of integers. This is useful for sort functions that sort their elements in place because it allows returning without copying.
In this case, I actually create multiple interim slices, so the effect is mostly wasted. I sacrifice performance for readability here since the goal is to demonstrate plugins and not implement a super efficient algorithm. The logic goes as follows:
If there are zero items or one item, return the original slice (already sorted).
Pick a random element as a peg.
Add all the elements that are less than the peg to the below slice.
Add all the elements that are greater than the peg to the above slice.
Add all the elements that are equal to the peg to the middle slice.
At this point, the middle slice is sorted because all its elements are equal (if there were duplicates of the peg, there will be multiple elements here). Now comes the recursive part. It sorts the below and above slices by calling Sort() again. When those calls return, all the slices will be sorted. Then, simply appending them results in a full sort of the original slice of items.
package main import "math/rand" func Sort(items []int) *[]int { if len(items) < 2 { return &items } peg := items[rand.Intn(len(items))] below := make([]int, 0, len(items)) above := make([]int, 0, len(items)) middle := make([]int, 0, len(items)) for _, item := range items { switch { case item < peg: below = append(below, item) case item == peg: middle = append(middle, item) case item > peg: above = append(above, item) } } below = *Sort(below) above = *Sort(above) sorted := append(append(below, middle...), above...) return &sorted }
BubbleSort Plugin
The second plugin implements the BubbleSort algorithm in a naive way. BubbleSort is often considered slow, but for a small number of elements and with some minor optimization it often beats more sophisticated algorithms like QuickSort.
It is actually common to use a hybrid sort algorithm that starts with QuickSort, and when the recursion gets to small enough arrays the algorithm switches to BubbleSort. The bubble sort plugin implements a Sort() function with the same signature as the quick sort algorithm. The logic goes as follows:
If there are zero items or one item, return the original slice (already sorted).
Iterate over all the elements.
In each iteration, iterate over the rest of the items.
Swap the current item with any item that is greater.
At the end of each iteration, the current item will be in its proper place.
package main func Sort(items []int) *[]int { if len(items) < 2 { return &items } tmp := 0 for i := 0; i < len(items); i++ { for j := 0; j < len(items)-1; j++ { if items[j] > items[j+1] { tmp = items[j] items[j] = items[j+1] items[j+1] = tmp } } } return &items }
Building the Plugin
Now, we have two plugins we need to build to create a shareable library that can be loaded dynamically by our main program. The command to build is: go build -buildmode=plugin
Since we have multiple plugins, I placed each one in a separate directory under a shared "plugins" directory. Here is the directory layout of the plugins directory. In each plugin subdirectory, there is the source file "<algorithm>_plugin.go" and a little shell script "build.sh" to build the plugin. The final .so files go into the parent "plugins" directory:
$ tree plugins plugins ├── bubble_sort │ ├── bubble_sort_plugin.go │ └── build.sh ├── bubble_sort_plugin.so ├── quick_sort │ ├── build.sh │ └── quick_sort_plugin.go └── quick_sort_plugin.so
The reason the *.so files go into the plugins directory is that they can be discovered easily by the main program, as you'll see later. The actual build command in each "build.sh" script specifies that the output file should go into the parent directory. For example, for the bubble sort plugin it is:
go build -buildmode=plugin -o ../bubble_sort_plugin.so
Loading the Plugin
Loading the plugin requires knowledge of where to locate the target plugins (the *.so shared libraries). This can be done in various ways:
passing command-line arguments
setting an environment variable
using a well-known directory
using a configuration file
Another concern is if the main program knows the plugin names or if it discovers dynamically all the plugins in a certain directory. In the following example, the program expects that there will be a sub-directory called "plugins" under the current working directory, and it loads all the plugins it finds.
The call to the filepath.Glob("plugins/*.so") function returns all the files with the ".so" extension in the plugins sub-directory, and plugin.Open(filename) loads the plugin. If anything goes wrong, the program panics.
package main import ( "fmt" "plugin" "path/filepath" ) func main() { all_plugins, err := filepath.Glob("plugins/*.so") if err != nil { panic(err) } for _, filename := range (all_plugins) { fmt.Println(filename) p, err := plugin.Open(filename) if err != nil { panic(err) } } }
Using the Plugin in a Program
Locating and loading the plugin is only half the battle. The plugin object provides the Lookup() method that given a symbol name returns an interface. You need to type assert that interface into a concrete object (e.g. a function like Sort()). There is no way to discover what symbols are available. You just have to know their names and their type, so you can type assert properly.
When the symbol is a function, you can invoke it like any other function after a successful type assert. The following example program demonstrates all these concepts. It dynamically loads all the available plugins without knowing which plugins are there except that they are in the "plugins" sub-directory. It follows by looking up the "Sort" symbol in each plugin and type asserting it into a function with the signature func([]int) *[]int. Then, for each plugin, it invokes the sort function with a slice of integers and prints the result.
package main import ( "fmt" "plugin" "path/filepath" ) func main() { numbers := []int{5, 2, 7, 6, 1, 3, 4, 8} // The plugins (the *.so files) must be in a 'plugins' sub-directory all_plugins, err := filepath.Glob("plugins/*.so") if err != nil { panic(err) } for _, filename := range (all_plugins) { p, err := plugin.Open(filename) if err != nil { panic(err) } symbol, err := p.Lookup("Sort") if err != nil { panic(err) } sortFunc, ok = symbol.(func([]int) *[]int) if !ok { panic("Plugin has no 'Sort([]int) []int' function") } sorted := sortFunc(numbers) fmt.Println(filename, sorted) } } Output: plugins/bubble_sort_plugin.so &[1 2 3 4 5 6 7 8] plugins/quick_sort_plugin.so &[1 2 3 4 5 6 7 8]
Conclusion
The "plugin" package provides a great foundation for writing sophisticated Go programs that can dynamically load plugins as necessary. The programming interface is very simple and requires detailed knowledge of the using program on the plugin interface.
It is possible to build a more advanced and user-friendly plugin framework on top of the "plugin" package. Hopefully, it will be ported to all the platforms soon. If you deploy your systems on Linux, consider using plugins to make your programs more flexible and extensible.
by Gigi Sayfan via Envato Tuts+ Code http://ift.tt/2gNh9za
0 notes
Video
youtube
Docker Container Port Mapping Tutorial for beginners | Docker Port Expos...
Docker Port Mapping. Running docker image on custom port. Docker port forward and expose
#docker #dockerportmapping #dockerportexpose #portforward #expose #portmapping #portforwarding #container #dockercontainer
1 note
·
View note
Video
youtube
Docker Container Port Mapping Tutorial for beginners | Docker Port Expos...
Hi, a new #video on #dockerportmapping is published on @codeonedigest #youtube channel. Learn docker container port forwarding and docker expose. What is docker port mapping and -p option. Running docker container on custom port.
Full Video Link: https://youtu.be/2gie3gpDJUg
#dockerportmapping #dockerportforwarding #rundockercontaineroncustomport #dockercontainerportmapping #dockerportmappingexplained #dockerportmappingnotworking #dockerportmappingvsexpose #dockerportmappingtutorial #dockercomposeportmapping #portmappinginrunningdockercontainer #dockercontainerportmappingexplained #dockercontainerportnotexposed #dockercontainerportchange #dockercontainerportforwardingnotworking #updatedockercontainerportainer #dockerportforwardingrunningcontainer #dockerportforwardingexistingcontainer #dockerportforwardingdoesn’twork #dockercontainerportsexplained #docker #dockertutorial #dockertutorialforbeginners #whatisdocker #dockercompose #dockerandKubernetes
#youtube#docker port mapping docker port forwarding run docker container on custom port docker container port mapping docker port mapping explained d
0 notes